Why can’t I get rid of track changes in Word
Note: If a document has been shared with you for review, you may not be able to turn off Track Changes. If you want to edit the document without tracking changes, you'll need to either save a copy or ask the person who sent it to you to share it again with review mode turned off.
How do I save without track changes
Remove Tracked Changes manually or selectively
If you turn on Track Changes, Word will save all changes and comments made. Click the Review tab on the Ribbon. Click the down arrow on Track Changes > Track Changes to turn it on or off.
How do I save a clean copy after track changes
To do this, follow these steps:Open Compare in the Review menu. Enter the Original on the left side and the Clean copy on the right side.Click Compare.A new document will be generated that shows all your tracked changes.Save this document with “Track Changes” in the name.
How do I save a document without showing markups
Under the "Document-specific settings" heading, uncheck the box for "Make hidden markup visible when opening or saving". (Despite the heading, this option applies to all documents you open.) On the Review tab, be sure the top right dropdown in the Tracking group is set to "No Markup" and save the document.
How do I save a document after making changes
If you've completed your document or want to save the work you've finished so far, here are some steps you can take:Select "File"Select "Save" or "Save as"Choose a location for your file.Choose a file name.Select the format for your file.Use the shortcut save feature to save your document in the future.
How do I finalize a Word document after track changes
Get your document ready to share by permanently accepting or rejecting tracked changes, and deleting comments. To review changes one at a time, click Review then Accept or Reject. To finalize the document all at once, click Accept All Changes or Reject All Changes.
How do I remove markup and track changes in Word
Click on “Accept,” under “Changes,” then use the arrow to navigate to and select “Accept All Changes in Document,” if you approve of all of the changes and want Word to automatically accept them in their entirety. By accepting all of the changes, Word removes their markups.
How to save an edited document while keeping the original version use
Using Save As to make a copy
If you want to save a different version of a document while keeping the original, you can create a copy. For example, if you have a file named Sales Report, you could save it as Sales Report 2 so you'll be able to edit the new file and still refer back to the original version.
How do I save a document without changing the original
To make sure you don't accidentally save changes in the original file, use Save a Copy BEFORE you start making your edits to ensure you're working on the new copy and not overwriting the original.
How do I save a document after track changes
To do this, follow these steps:Open Compare in the Review menu. Enter the Original on the left side and the Clean copy on the right side.Click Compare.A new document will be generated that shows all your tracked changes.Save this document with “Track Changes” in the name.
How do you edit the existing document and save the changes
To make changes to a document, in the upper-right corner, select Edit Document > Edit. If someone else created the document, they might not allow editing. You can go to File > Save as, save it with another name, and edit the new document.
How do I save a clean copy without track changes
Remove Tracked Changes manually or selectively
Click the Review tab on the Ribbon. Click the down arrow on Track Changes > Track Changes to turn it on or off.
How do I save a clean copy of an edited Word document
To create an “Original” version, click “save as” and add “Original” to the beginning of the document name. Now you have an original of the text that you use to compare against your finished version. Next, save the document again, this time adding “Clean Copy” to the name.
How do I save a Word document after editing
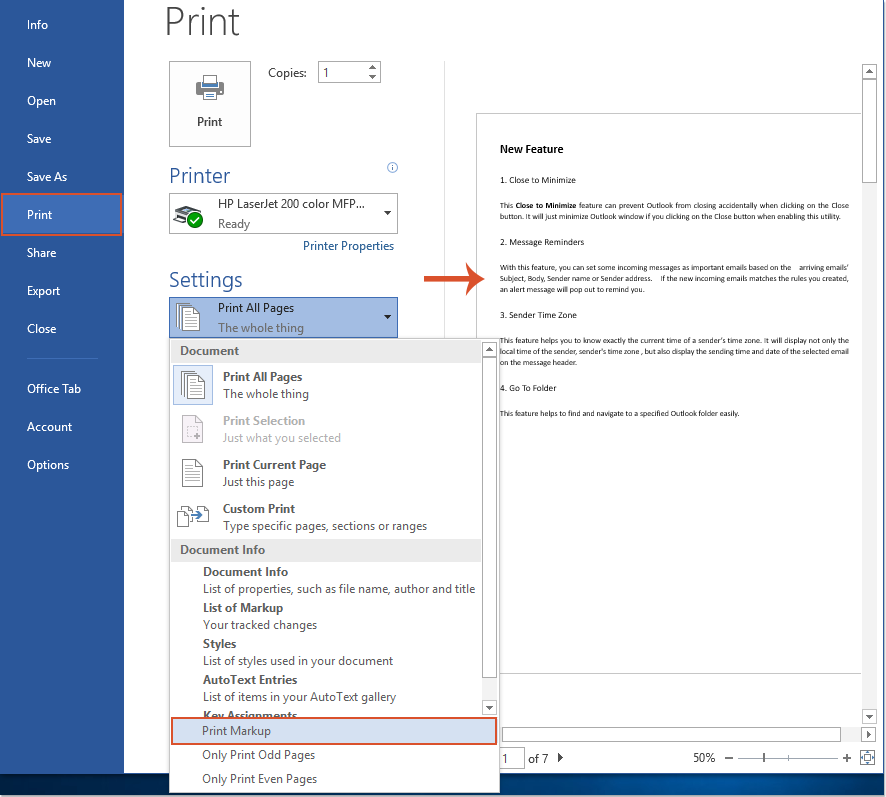
Save your document, so you don't lose all your hard work, then print it to share it with others. Click FILE > Save, pick or browse to a folder, type a name for your document in the File name box, and click Save. Save your work as you go – hit Ctrl+S often. To print, click the FILE tab, and then click Print.
How do I remove tracked changes from a Word document
Remove tracked changes
On the Review tab, go to Changes. Select Accept or Reject. As you accept or reject changes, Word will move to the next change. Repeat until you've removed all changes in the document.
Does Word save edit history
Can You View the Editing History of a Word Document Yes, a Word Edit History feature lets you see previous file versions. If you're using Microsoft 365 on a Mac device, select Browse Version History. For Word 2016 and 2019 users, choose File, then Browse Version History.
How do I create an edit and save document
How to Create a Word Document From a TemplateLaunch Microsoft Word by clicking the icon or searching for it in the Start menu.Click on the "File" menu at the top left corner of the screen.Click on "New" and select "From Template."Choose a template to begin editing your document.
How do you save a Word document that can be edited
Enable editing in your documentGo to File > Info.Select Protect document.Select Enable Editing.
How do I save a Word document as read-only
Save as Read-onlySelect the Microsoft Office Button image , and then select Save or Save As if you have recently saved the document.Select Tools.Select General Options.Select the Read-only recommended check box.Select OK.Save the document.
How do I turn off read-only
Disable Read-Only Mode in File Properties
Right-click on the file you want to change file attributes for and select Properties. In the Properties window, open the General tab. In the Attributes section, uncheck the Read-only option. Click Apply and OK to save the changes.
Why do Word documents become read-only
You may find that when you are opening files, they open as read-only. Read-only means you can only view or print. In some cases, this is for added security, such as when you are opening files from the internet, and other times, it can be due to a setting that can be changed.
Why are documents saved in read only
In Windows, you can mark files as read-only to discourage other users from modifying the original content of the file. If the read-only file attribute is turned on, you can open and read the file but cannot delete, overwrite or edit the original content.
What is read only mode
Read-only is a file attribute which only allows a user to view a file, restricting any writing to the file. Setting a file to “read-only” will still allow that file to be opened and read; however, changes such as deletions, overwrites, edits or name changes cannot be made.
How do I stop Word from saving documents as read only
Remove read onlyClick the Microsoft Office Button. , and then click Save or Save As if you have previously saved the document.Click Tools.Click General Options.Clear the Read-only recommended check box.Click OK.Save the document. You might need to save it as another file name if you have already named the document.
How do I permanently turn off read only
1. Disable Read-Only Mode in File PropertiesRight-click on the file you want to change file attributes for and select Properties.In the Properties window, open the General tab.In the Attributes section, uncheck the Read-only option.Click Apply and OK to save the changes.